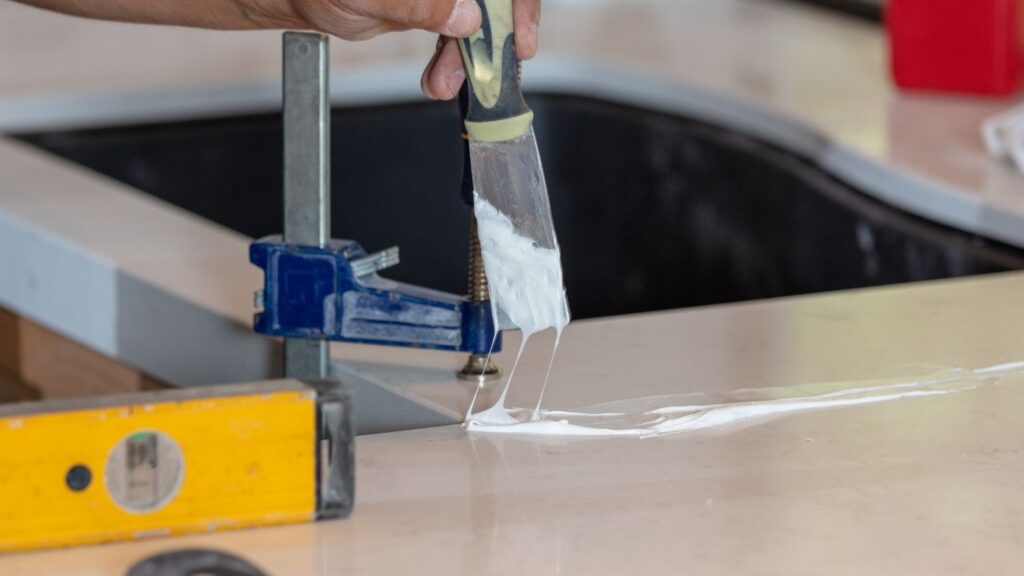
The installation techniques and hardware for countertops vary significantly based on the material. Here’s a general overview for the most common types:
General Steps Applicable to Most Countertops:
- Measurement and Templating: Accurate measurements are crucial. For complex layouts, a physical or digital template might be created to guide cutting.
- Cabinet Preparation: Cabinets must be level and securely fastened. Support structures or levelers might be needed.
- Dry Fitting: Before permanent installation, the countertop is placed on the cabinets to check for fit, alignment, and overhang. Adjustments are made as necessary.
- Adhesive and/or Mechanical Fasteners: Depending on the material, countertops are secured to the cabinets using construction adhesive, silicone caulk, screws, or a combination.
- Seam Joining (for multiple pieces): Special adhesives (like epoxy or color-matched seam sealers) and sometimes mechanical fasteners (seam clamps, bolts) are used to create tight, less visible seams.
- Sink and Faucet Cutouts: These are typically done by the fabricator before installation. If done on-site, specialized tools like wet saws (for stone) or routers (for solid surface and wood) are used.
- Finishing: This may involve applying sealers (for natural stone, concrete, and butcher block), polishing edges, or cleaning the surface.
Specific Materials and Techniques:
-
Stone Countertops (Granite, Marble, Quartzite, Soapstone, Limestone, Travertine):
Installation Techniques:
- Heavy Lifting: These require multiple people due to their weight.
- Silicone Adhesive: A bead of silicone caulk is typically applied to the top edges of the cabinets to provide adhesion and a slight cushion.
- Seam Joining: Epoxy or color-matched adhesives are used for seams, often with seam clamps to ensure a tight bond.
- Support: For large overhangs or weaker cabinet structures, corbels or hidden support brackets are essential and must be installed before the countertop.
Hardware:
- Silicone Caulk: For adhesion to cabinets.
- Epoxy or Seam Adhesive: For joining slabs.
- Seam Clamps or Pullers: To tightly join slabs during adhesive curing.
- Support Brackets/Corbels: For overhang support.
- Screws (occasionally): To secure to specific support structures.
-
Quartz Countertops:
Installation Techniques: Similar to natural stone but generally slightly lighter.
- Silicone Adhesive: Used to adhere the countertop to level cabinets.
- Seam Joining: Color-matched adhesives are common for less visible seams.
- Leveling: Shims may be used to ensure a perfectly level surface.
Hardware:
- Silicone Caulk: For adhesion.
- Seam Adhesive: Color-matched for joining.
- Shims: For leveling.
-
Solid Surface (e.g., Corian):
Installation Techniques:
- Adhesive: Special color-matched adhesives are used to create virtually seamless joints and adhere the countertop to the cabinets.
- Integrated Sinks: Often installed as part of the countertop using the same adhesive for a seamless look.
- Scribing: The material can be scribed and sanded to fit perfectly against walls.
Hardware:
- Color-Matched Adhesive: For joining and adhering.
- Clamps: To hold pieces together while the adhesive cures.
- Screws (occasionally): For additional securement in specific areas.
-
Laminate Countertops:
Installation Techniques:
- Pre-fabricated: Often come as a single piece that is screwed to the base cabinets from underneath.
- Custom-built: Laminate sheets are adhered to a substrate (particleboard or MDF) using contact cement. Edges are finished with laminate strips or edge banding.
Hardware:
- Screws: To attach to the cabinet frames from below.
- Contact Cement: For adhering laminate to the substrate.
- Edge Banding Adhesive: For attaching edge strips.
-
Concrete Countertops:
Installation Techniques:
- Heavy Lifting: Similar to stone.
- Adhesive: Construction adhesive or silicone may be used.
- Support: Adequate cabinet structure is crucial due to weight.
- Seam Joining: Concrete-specific epoxy or patching compounds are used.
Hardware:
- Construction Adhesive or Silicone Caulk: For adhesion.
- Concrete Seam Repair Products: For joining.
- Support Brackets/Corbels: For overhangs.
-
Butcher Block (Wood):
Installation Techniques:
- Expansion Considerations: Wood expands and contracts with humidity, so allowances must be made. Attachment methods often allow for slight movement.
- Screws with Oversized Holes/Washers: These allow for movement while securing the top from underneath.
- Countertop Bolts/Connector Bolts: Used to join sections from underneath, allowing for tightening.
- Construction Adhesive (sparingly): May be used in conjunction with mechanical fasteners.
Hardware:
- Screws with Washers: To allow for wood movement.
- Countertop Connector Bolts/Miter Bolts: For joining sections.
- Construction Adhesive (flexible).
- Support Brackets/Corbels: For overhangs.
-
Recycled Glass Countertops:
Installation Techniques: Similar to stone or quartz depending on the base material (resin or concrete).
Hardware: Similar to stone or quartz.
-
Tile Countertops:
Installation Techniques:
- Substrate Preparation: A stable backer board (cement board) is screwed to the cabinets.
- Thin-set Mortar: Tiles are adhered to the backer board using thin-set mortar.
- Grouting: Grout is applied between the tiles and sealed.
Hardware:
- Cement Backer Board and Screws: For the substrate.
- Thin-set Mortar: For adhering tiles.
- Grout: To fill spaces between tiles.
- Grout Sealer: To protect grout from stains.
-
Stainless Steel Countertops:
Installation Techniques: Often custom-fabricated and installed as a single unit or seamed together. Typically attached with screws from underneath.
Hardware: Screws.
-
Glass Countertops:
Installation Techniques: Often installed with silicone adhesive to allow for thermal expansion and contraction. May require specialized support depending on thickness and span.
Hardware: Silicone adhesive, specialized support brackets if needed.
It’s crucial to consult the manufacturer’s instructions for the specific countertop material you are installing, as techniques and hardware recommendations can vary. For heavier or more complex installations, professional installation is highly recommended.